A Step-by-Step Guide to create 3D floor plans with 3D House Planner
With the aid of 3D House Planner, creating your ideal home has never been easier. These tools are your creative partners whether you’re organizing a renovation, starting from scratch, or simply exploring design concepts. We’ll walk you through the steps of using 3D House Planner to show you all the necessary tools and features to make your vision a reality.
What is 3D House Planner?
3D House Planner is a professional home design web application that allow users to design houses and apartments. It is completely free and can be accessed through your browser. You can import and export 3D models for personal or commercial purposes.
Aside from home design, you can import your own 3D objects, change the appearance or position of objects, create videos, take screenshots, and do a lot more. The app currently supports three file formats for import: GLB, GLTF, OBJ, and Babylon models.
You can browse our catalog and choose from thousands of objects to furnish and decorate both the interior and exterior of your home. We offer a wide range of furniture, decorative accessories, electric devices, and household appliances to enhance your design.
The app allows you to design up to 50 floors, providing a realistic feel and texture to objects through physically based rendering (PBR) and standard materials settings. We also offer a texture library with high-quality textures, including Albedo, normal, ambient occlusion, metalness, and roughness maps. You can add these materials to any 3D model. You can save your scenes on your own device by exporting the 3D model and continue working by importing it again.
Step 1: Getting Acquainted with the Interface
Scene settings
Let’s start with the scenario settings. On the left side, there is a row of switch buttons that allow you to switch between modes. The first button toggles between 2D and 3D views.
The second button changes the camera mode, allowing you to choose between Arc rotate camera and Universal camera. The Arc rotate camera orbits around a target position, whereas the Universal camera operates in the manner of a first-person shooter camera.
The third button toggles between night and day views, and the fourth toggles the wall builder feature for sketching walls on and off. When the wall builder is enabled, you’ll see a text box with the sketch position, drawing angle, and distance. To define wall thickness and wall height, use the sliders located below floor sliders at the top right corner. When you are done sketching, press “Enter”.
The fourth button enable measurements of floor area and wall distance. Click on the desired wall or floor to display measurement results.
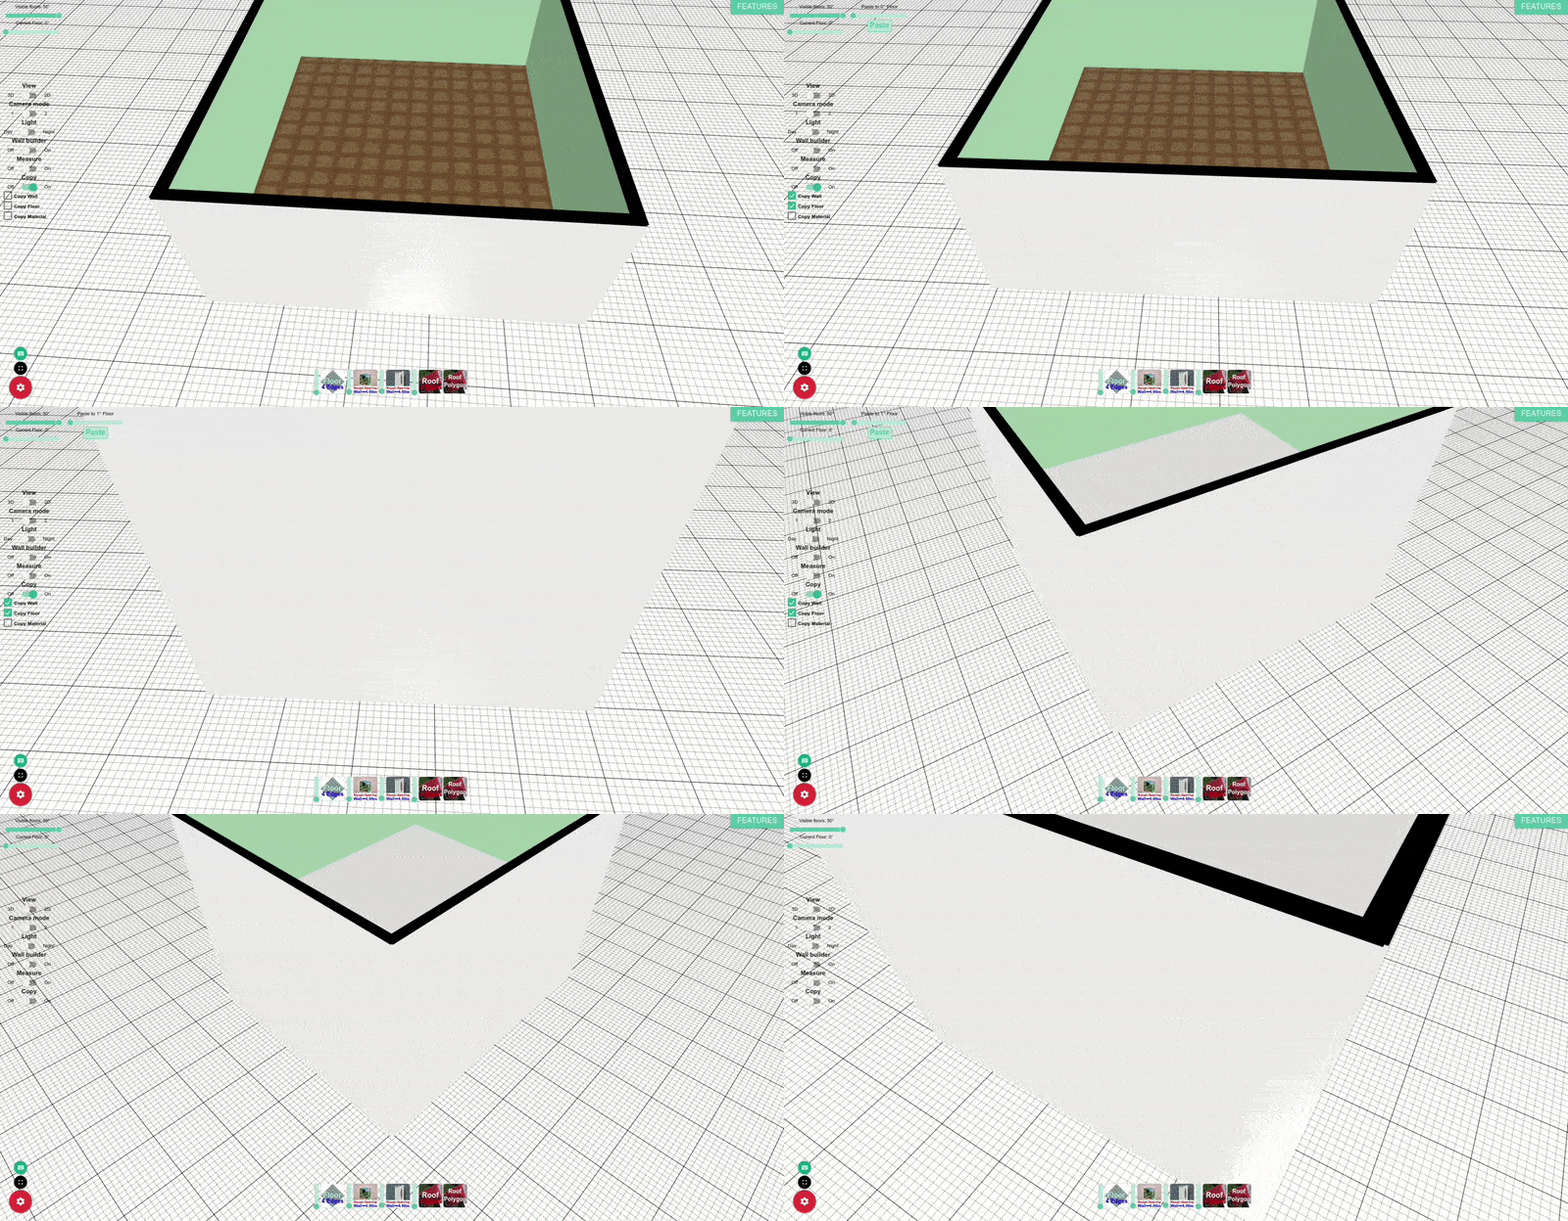
The fifth button allows you to copy and paste floors, walls, and materials. When you decide to copy floors or walls, check the appropriate boxes, choose the floor where the objects will be copy-pasted (at floor settings), and then click the paste button. If you decide to copy materials, select the appropriate checkbox, click on the object containing the desired material, click on the part of the object you want to paste, and then click the paste button. To copy-paste an object, select it and press Ctrl+C, then click on the location where you want to paste it and press Ctrl+V.
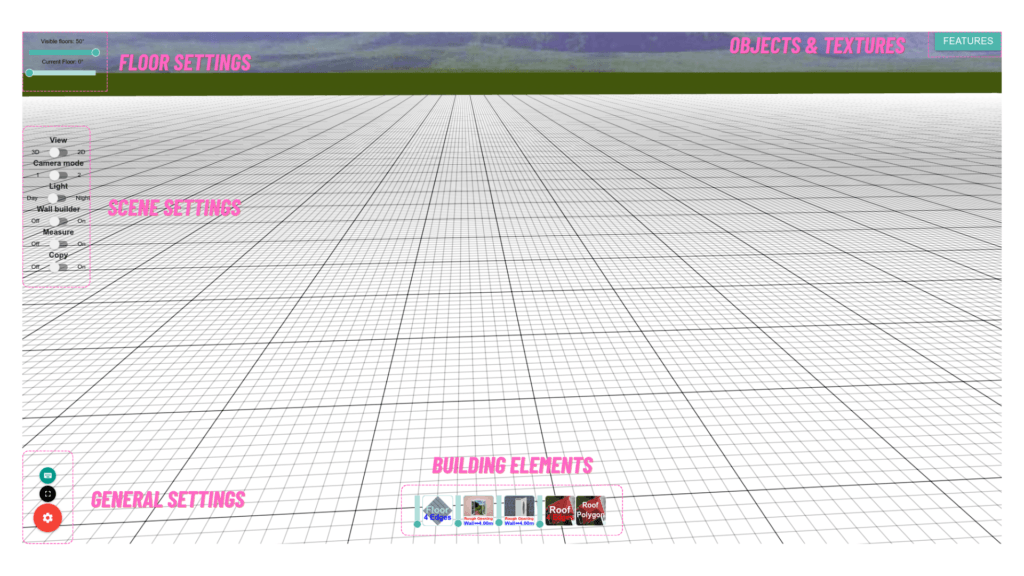
Building elements
There are buttons at the bottom to add roofs, floors, windows openings, and door openings. You can change its geometry by dragging and dropping spheres to the positions you want. By holding down the Shift key, you can activate the snap-to-grid tool.
Objects and textures
To add objects from our catalog, go to “Features” and then “Objects.” For precise object placement, use hotkeys 1, 2, and 3 to activate the translation, rotation, and bounding box tools. The snap-to-grid tool also works for these commands when the Shift key is pressed. When doors or windows touch the wall, rough openings are automatically generated for a better user experience and faster sketching.
To change the appearance of any object, simply click on it and the material attributes will be displayed for customization. You can also apply textures from the library. To add textures, go to “Features”, “Textures”, select the part of the object where the texture should be applied, and then click on the desired texture.
General settings
The buttons located at general settings consists of Hotkeys information, full screen mode, translate object, rotate object, bounding box, delete object, take snapshot, record video, export scene, import scene, import floor plan.
Step 2: Ready for the First Sketch
- Walls: Click on the “Wall Builder” switch button. Choose the desired wall thickness, height and floor number. When you are done sketching, press “Enter”.

- Floors: Insert floors by selecting the number of floor edges, clicking on the desired position and clicking on the Floor button. Drag the spheres to the desired position to reshape the floors. All buttons from the building element group works with the same principle.
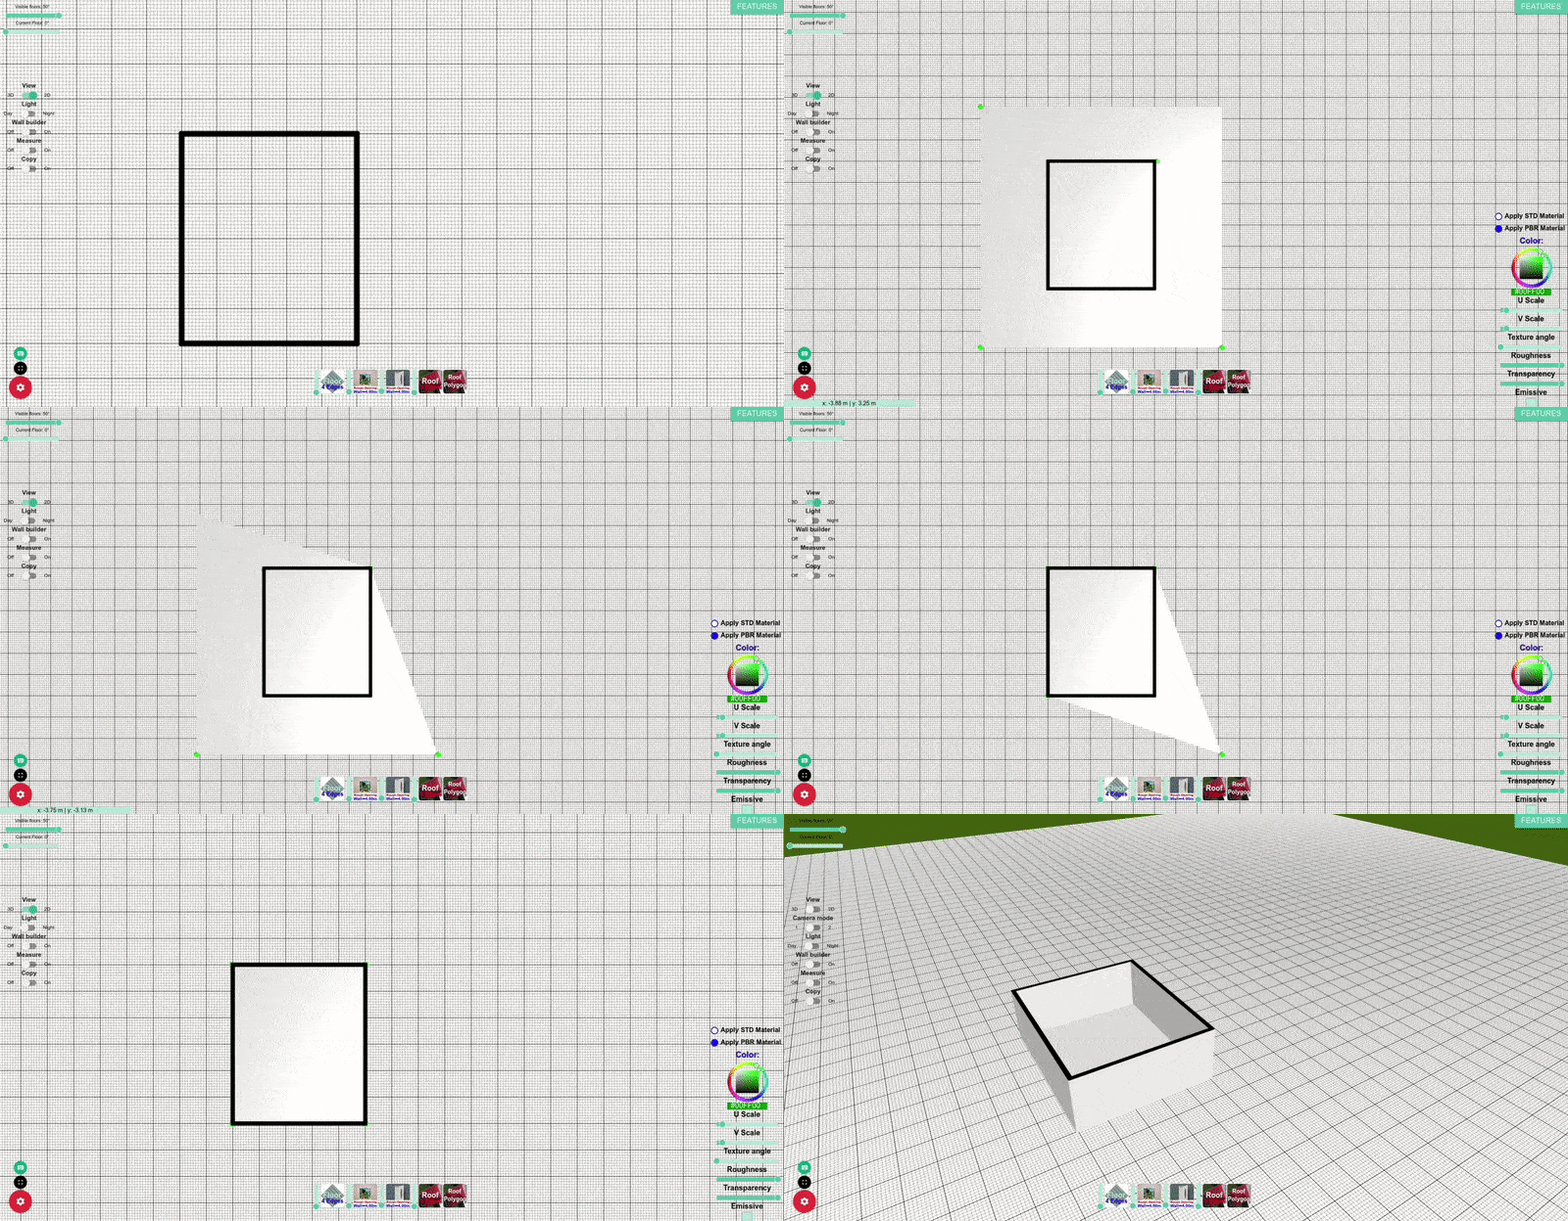
- Dimension tool: To mark dimensions in the scene, click on the “Measure” switch button, mark the “Insert measurement” checkbox and click on walls or floors.
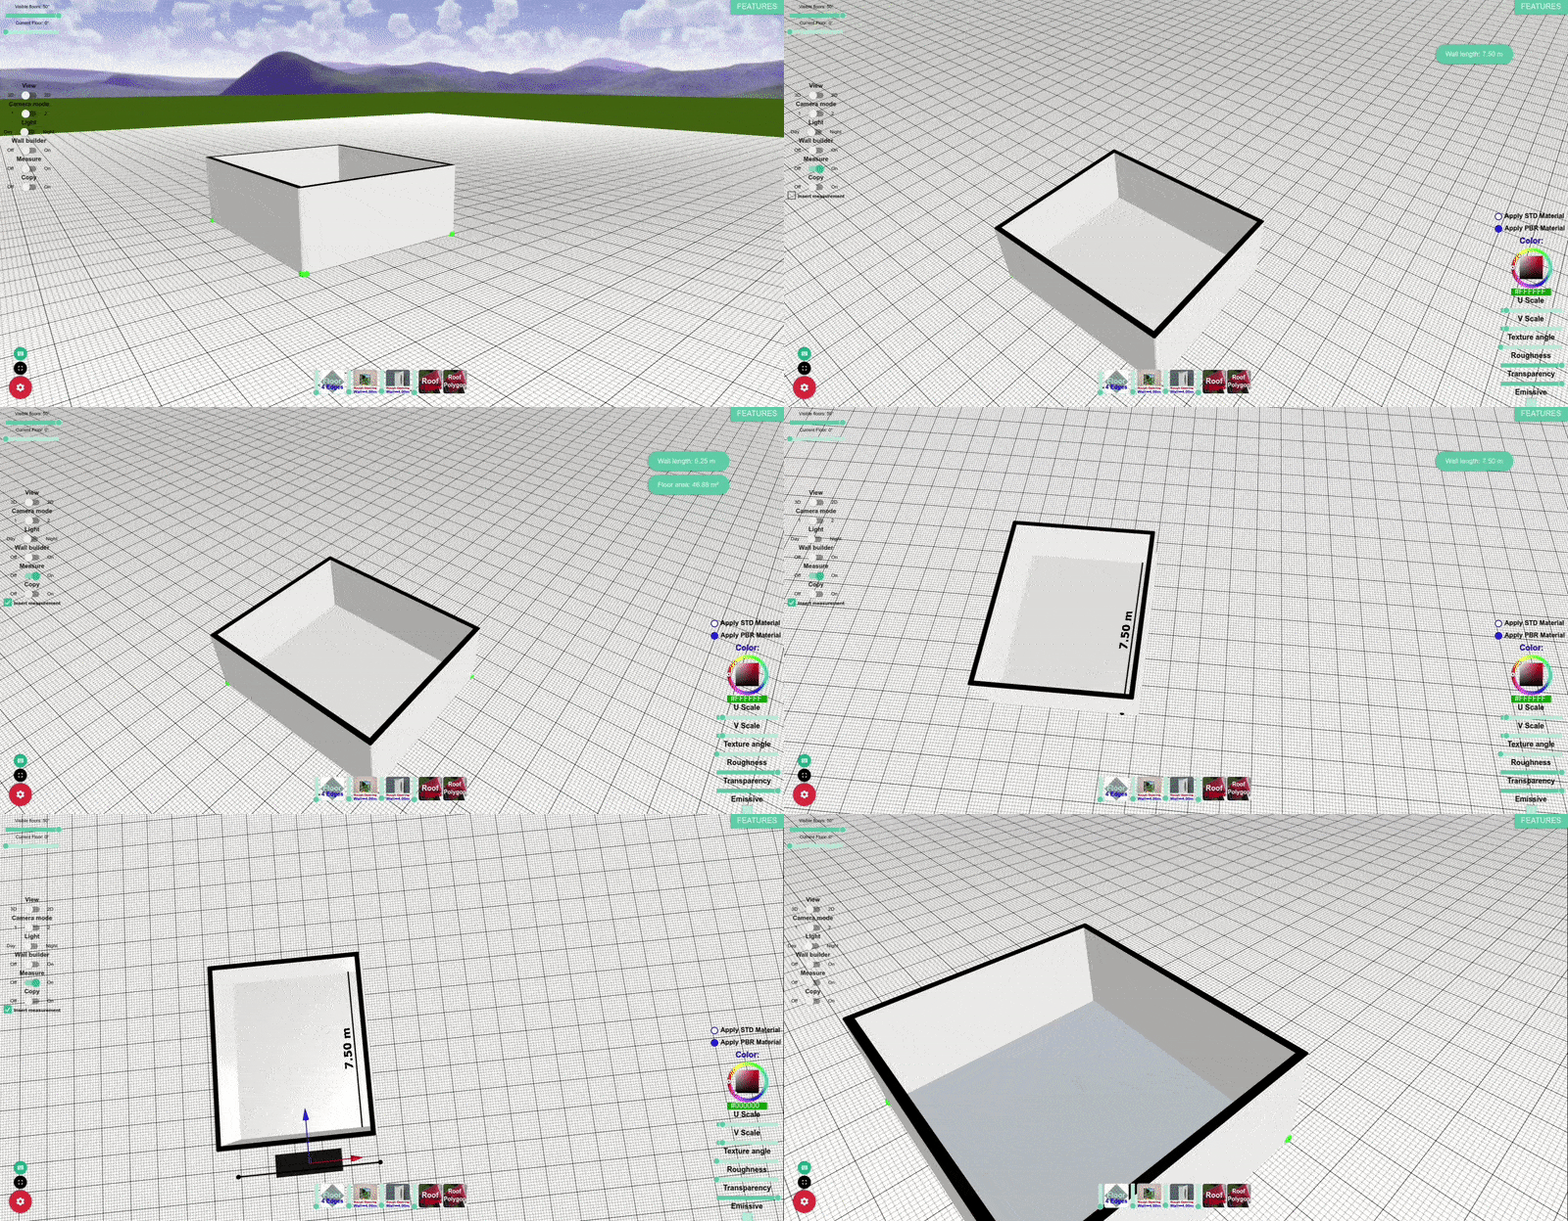
Step 3: Customize Materials and Textures
- Apply materials and textures: To make your design more realistic, apply materials and textures to walls, floors, and objects. This step allows you to experiment with various finishes, from hardwood floors to brick walls, to see how they fit your aesthetic.
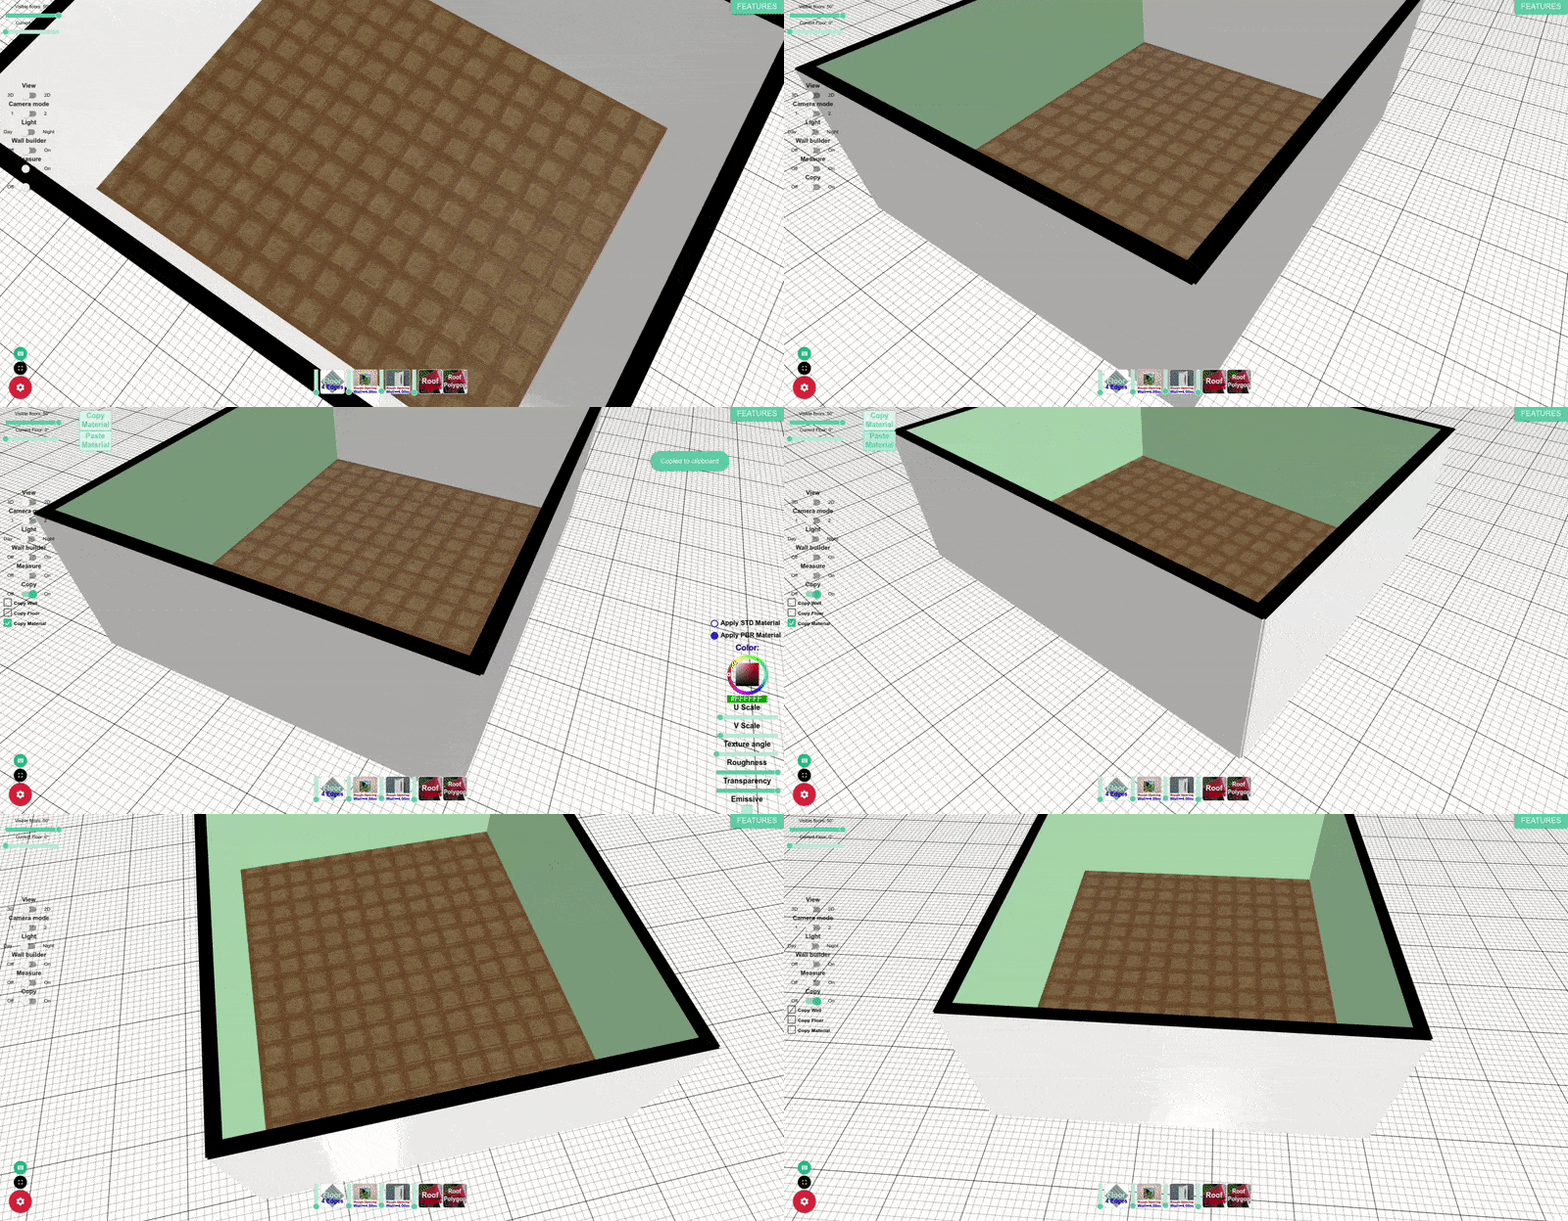
Step 4: Copy Floors and Walls
When you decide to copy floors or walls, check the appropriate boxes, choose the floor where the objects will be copy-pasted (at floor settings), and then click the paste button.
Step 5: Add 3D Objects
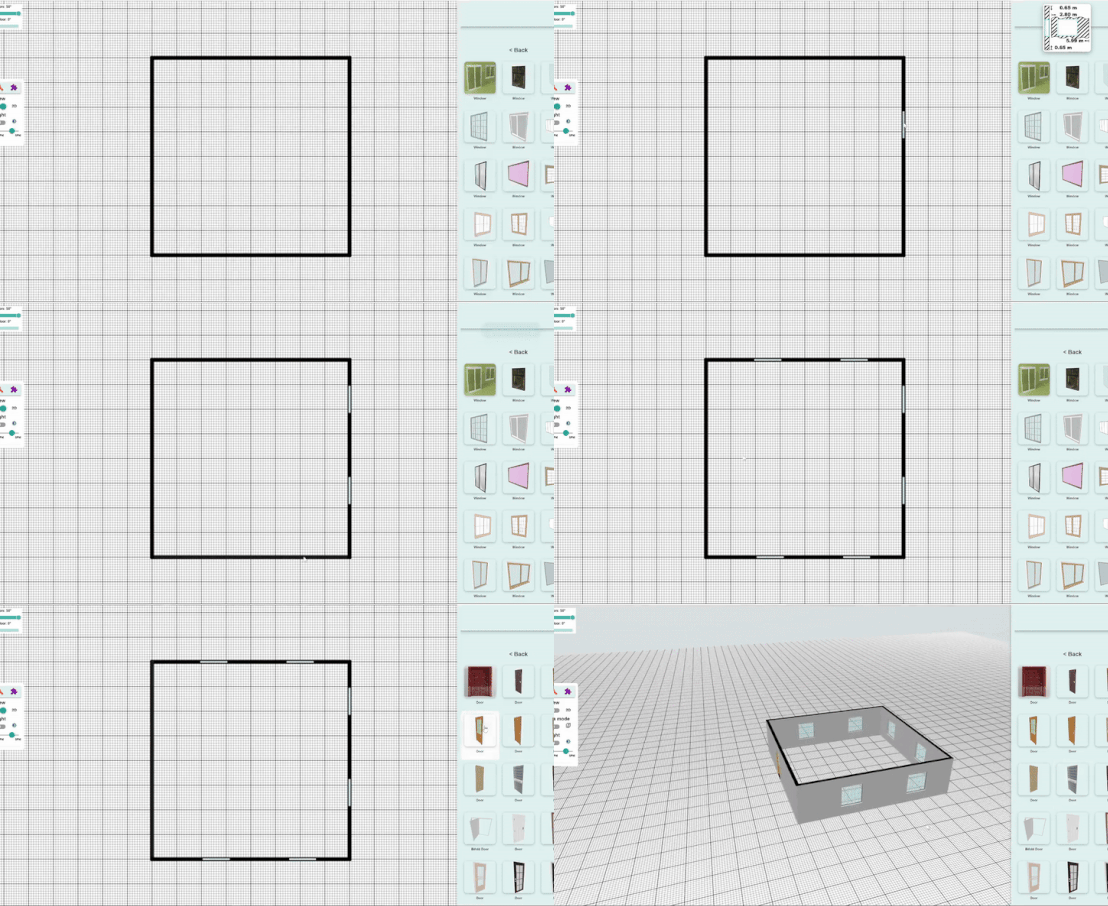
Navigate through the object tab inside the “Features” button to find the type of item you want to add to your scene. Once you’ve located the desired object category, click on it to view the available items. Objects are shown as thumbnails with names and images. To add an object, simply click on a spot in the scene and then click on the object. You can freely move objects by dragging them. To copy-paste an object, press Ctrl+C, then click on the location where you want to paste it and press Ctrl+V.
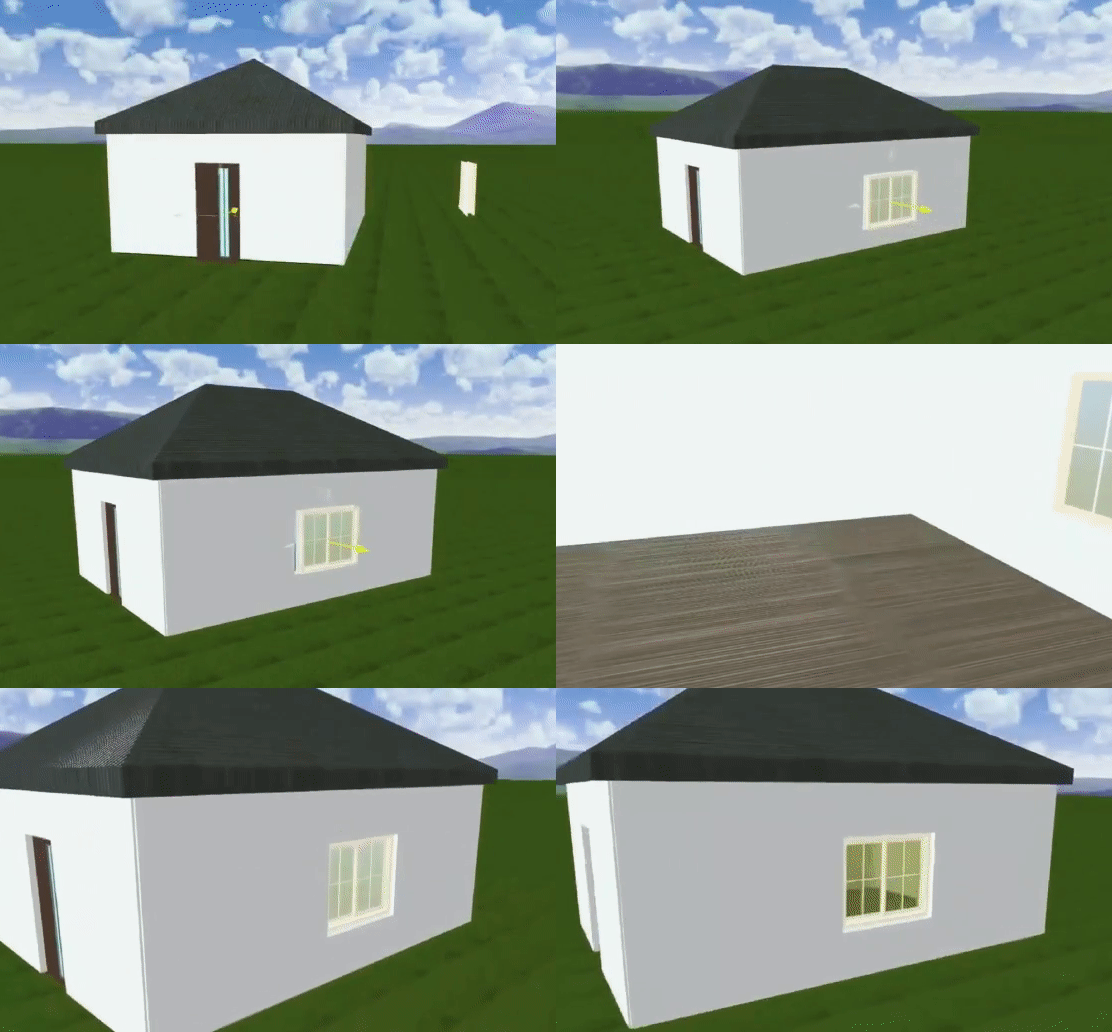
When a door or window touches the wall, a rough opening is generated automatically. This is to ensure a better user experience and faster sketch.
Convert Blueprint to 3D Model using AI
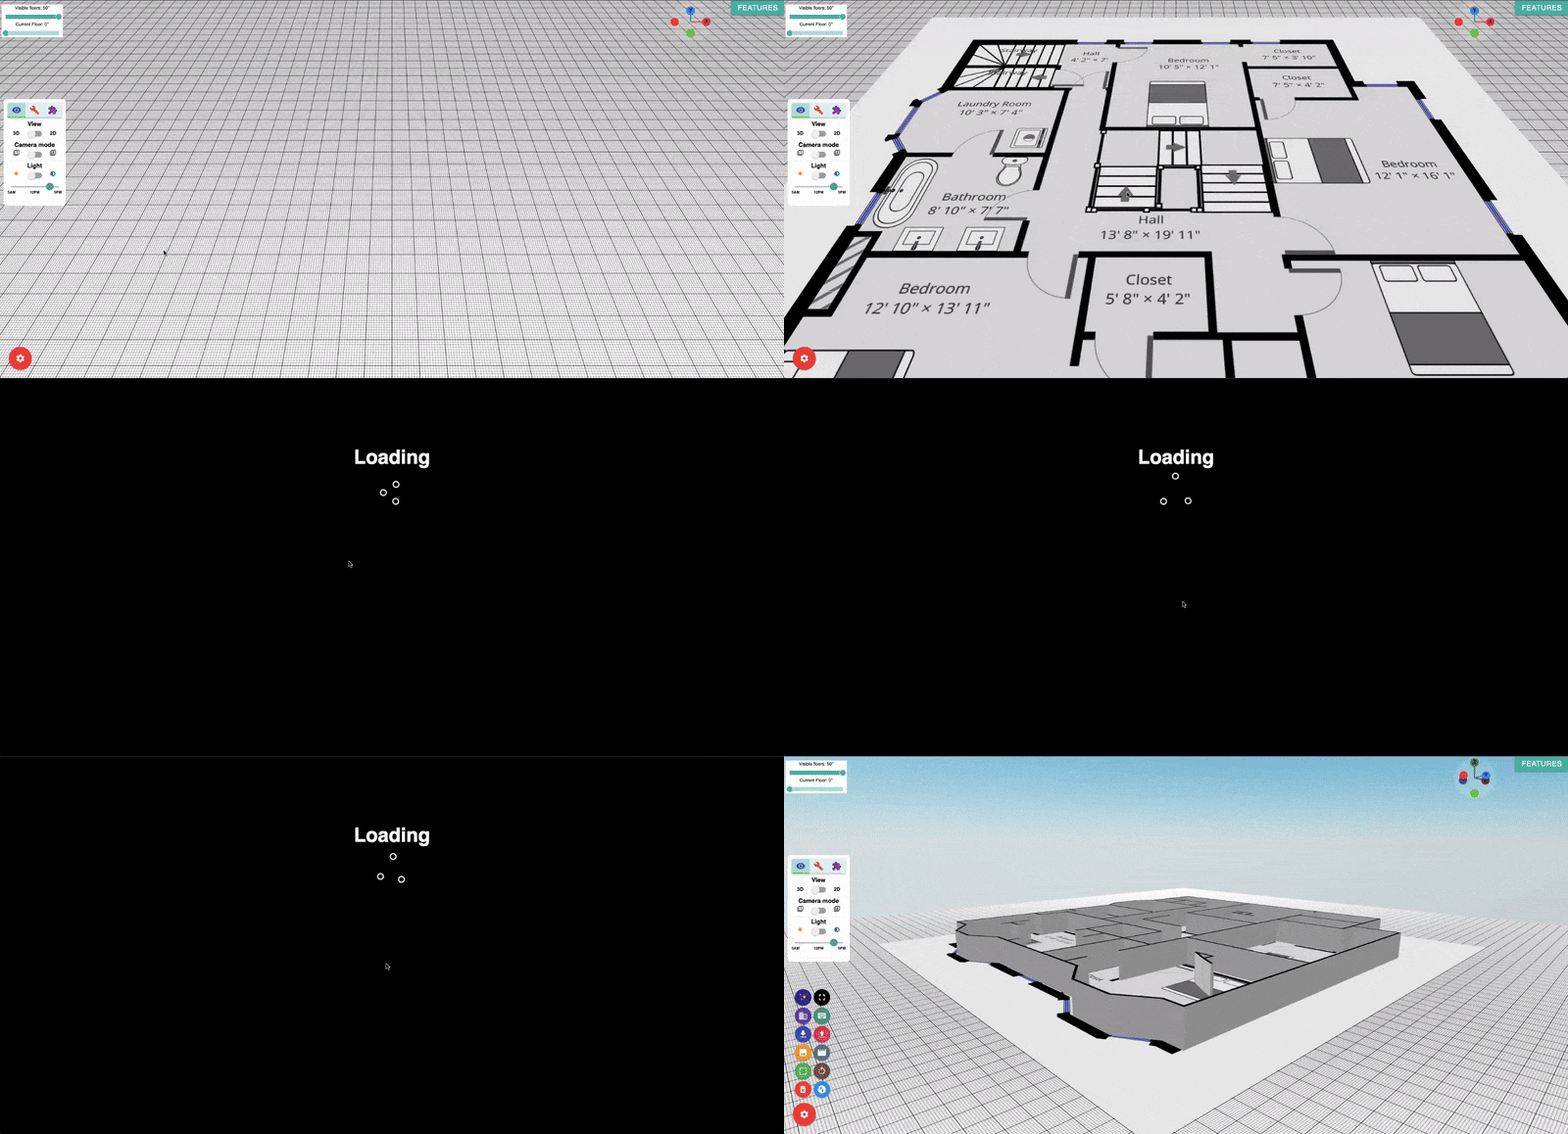
3D House Planner AI tool lets users turn 2D floor plans into interactive 3D models. Users can upload or draw a 2D layout, and AI automatically detects walls, rooms to generate a 3D version. This makes designing, visualizing, and editing home layouts fast and easy. Perfect for architects, interior designers, or homeowners planning renovations.
Step 6: Save and Share Your Design
Once you’re satisfied with your design, save your project. 3D house Planner allows you to save your work in a GLB format. Additionally, you can take snapshots or record videos to share with others, such as contractors, architects, or friends and family for feedback.
You can also generate photorealistic architectural renderings by combining the sketches generated by 3D House Planner with the AI tools available in the market.
Conclusion
Using 3D House Planner is a creative and empowering way to bring your home design ideas to life. With this App and these step-by-step instructions, you can design and visualize your dream home with ease. Remember to explore additional features and tools, since we are constantly updating.
We invest our time and resources to provide a better experience for the users at no cost. Due to this, we depend on donations to keep this App running.
💖 Here is how you can help us:
- Donation: A single donation can power our development and keep the app running smoothly.
- Leave a review: Reviews not only help us find areas for improvement, but also rank our site higher in search engines, allowing more visitors to get to know this application.
Your contributions, no matter the size, make a genuine impact. They enable us to dream bigger, create better, and offer you an unparalleled home design experience.
If you want to contribute to this project, go to 3D House Planner website and click on “Contribute”
